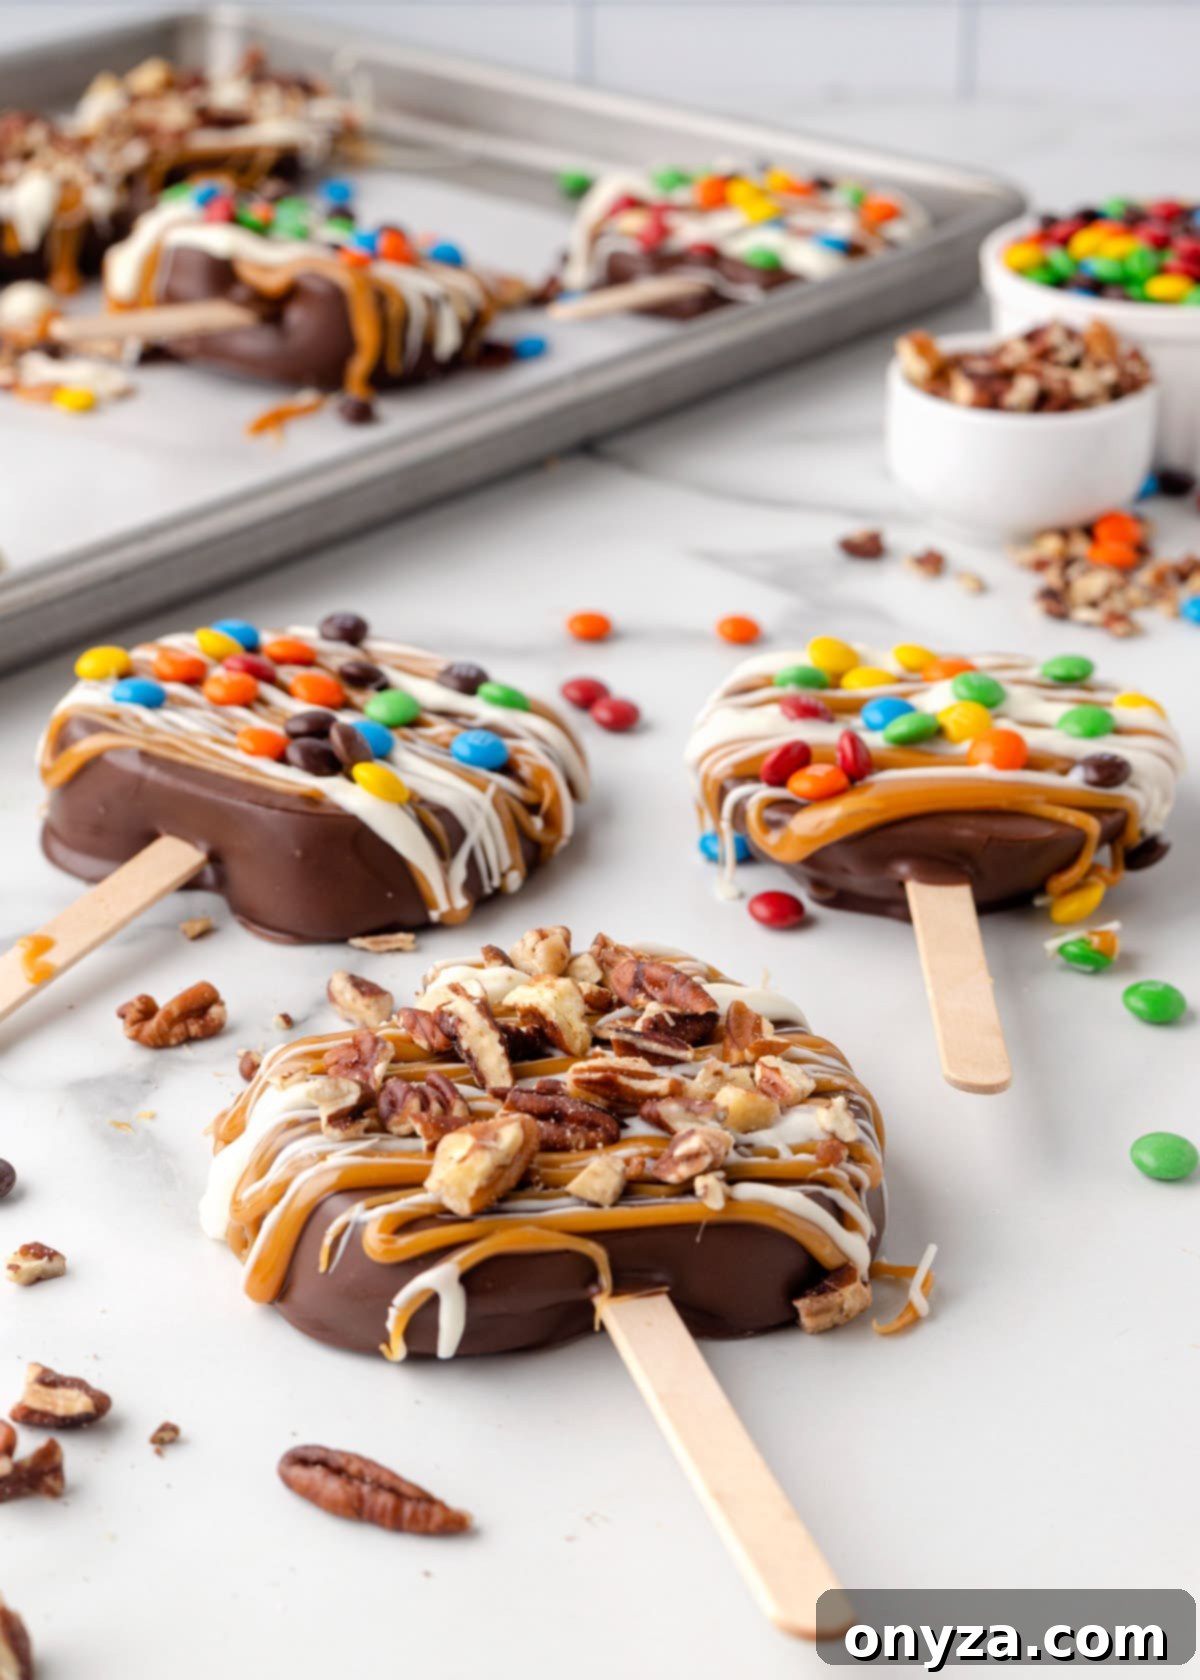
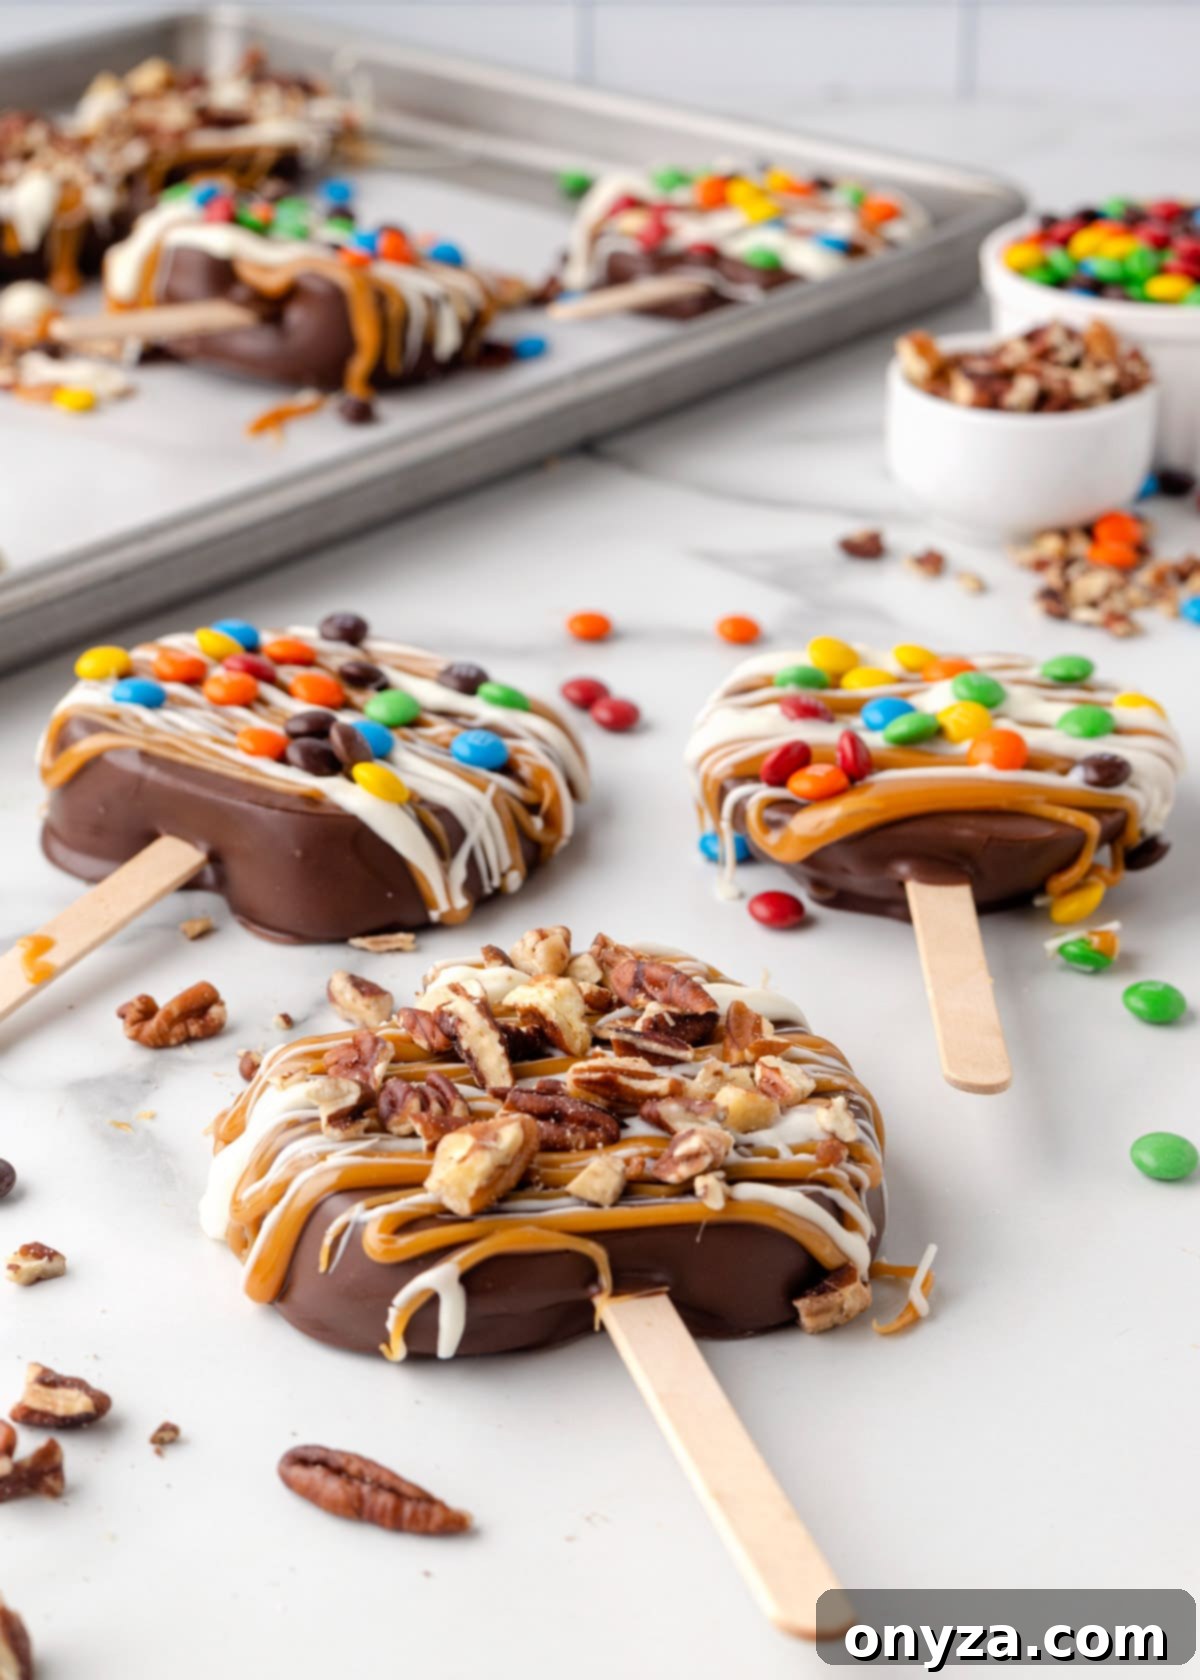
Welcome to the enchanting world of autumn treats, where the crispness of apples meets the lusciousness of chocolate and caramel. Our **Chocolate Covered Caramel Apple Slices** are a delightful twist on a classic fall favorite, offering an elegant yet incredibly fun-to-make dessert perfect for family gatherings, holiday parties, or simply a cozy evening in. Imagine succulent apple slices, generously enrobed in your choice of rich dark or creamy milk chocolate, then beautifully drizzled with gooey caramel, and finally adorned with a dazzling array of your favorite toppings. This recipe not only delivers an unforgettable taste experience but also transforms dessert preparation into a joyful, interactive activity for everyone.
This post contains affiliate links. As an Amazon Associate, I earn a commission (at no additional cost to you) from qualifying purchases made by clicking these links. Rest assured, all recommendations and opinions expressed are authentically my own.
Why Chocolate Covered Caramel Apple Slices Are a Must-Try
While traditional whole caramel apples hold a special place in our hearts, especially after a delightful trip to the apple orchard, this sliced version offers several compelling advantages that make it superior for many occasions. Here’s why these **caramel apple slices** have become a beloved staple in our family’s fall tradition:
- Effortless Customization for Every Palate: The individual slice format is a dream for personalization. Each person can choose their preferred chocolate, caramel drizzle, and a unique combination of toppings. This means everyone gets exactly what they love, making it a fantastic dessert for diverse tastes and a brilliant way to engage children in the kitchen. From crunchy nuts to colorful candies, the creative possibilities are endless.
- Decadent Topping-to-Fruit Ratio in Every Bite: Unlike whole apples where only the exterior is coated, these slices ensure that every single bite delivers a luxurious balance of crisp apple and rich toppings. The entire surface area of each slice is enveloped in decadent layers of chocolate and caramel, guaranteeing a truly indulgent experience from edge to core. This enhanced ratio makes for a more satisfying and flavorful treat.
- Superior Ease of Eating and Serving: Traditional whole caramel apples, while charming, can be notoriously messy and challenging to eat, particularly for younger children or at social gatherings. Cutting into a sticky, hard-coated apple can be cumbersome. Our **chocolate caramel apple slices** eliminate this fuss. Pre-sliced and served on a convenient stick, they are incredibly easy to handle, bite into, and serve, making them ideal for entertaining and a much cleaner option for little hands.
These benefits combine to create a treat that is not only delicious but also practical and wonderfully adaptable, making them a perfect addition to your autumn culinary repertoire.
Essential Ingredients for Irresistible Chocolate Caramel Apple Slices
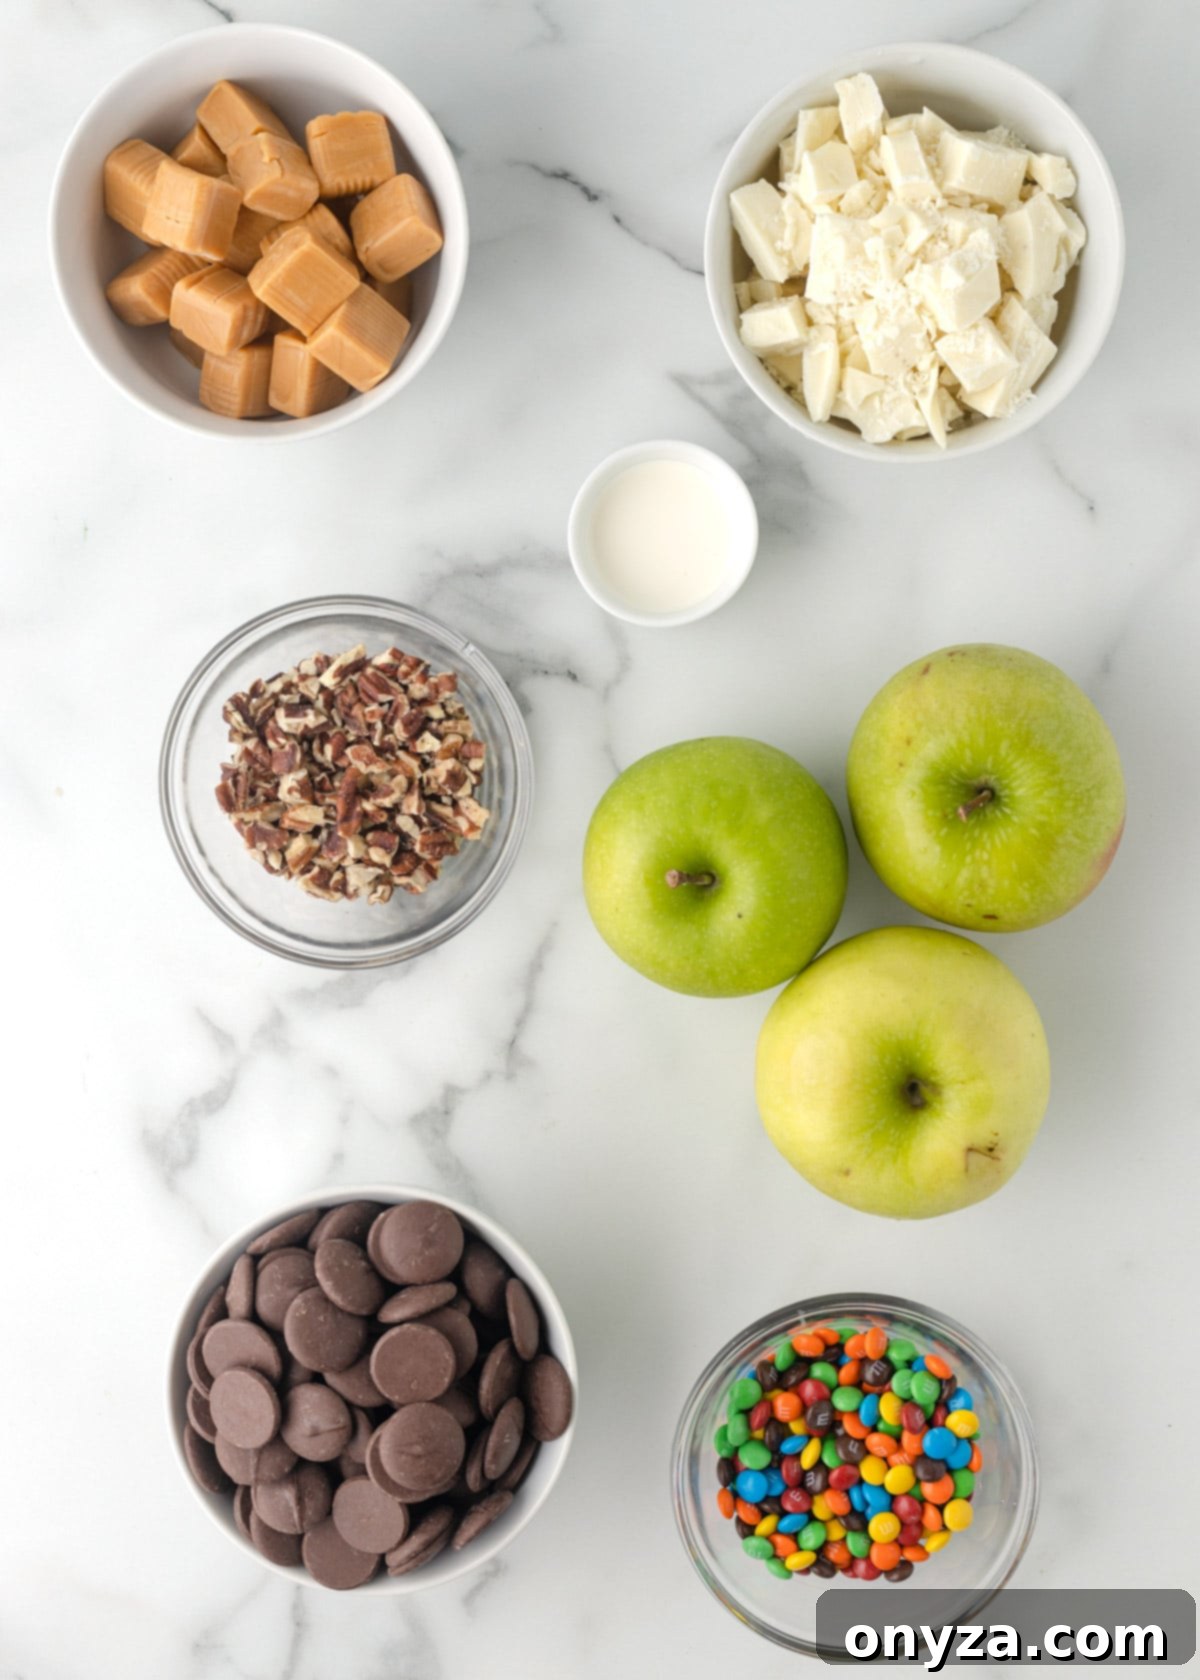
Crafting these delectable treats requires a few key ingredients, each playing a crucial role in achieving the perfect balance of flavors and textures. Quality ingredients make all the difference, so choose wisely!
- Large, Fresh Apples: The foundation of this dessert, apples provide a refreshing tartness or crisp sweetness that beautifully contrasts the rich coatings. We highly recommend using crisp varieties like Granny Smith (for a delightful tart kick that cuts through the sweetness) or Honeycrisp (for a sweet-tart profile and exceptional crunch). Look for apples that are firm, blemish-free, and ideally, organic. Their robust texture holds up well to the coatings and ensures a satisfying bite.
- High-Quality Chocolate Melting Wafers: For ease and consistently smooth results, melting wafers are your best friend. These chocolates are specifically formulated to melt effortlessly, provide a glossy finish, and set quickly without the need for intricate tempering at home. For the ultimate flavor, I consistently choose Ghirardelli’s Dark Chocolate or Milk Chocolate Melting Wafers. Their quality ensures a superior taste and texture that truly elevates these treats. White Chocolate Melting Wafers are also a fantastic option for contrasting drizzles or a different base flavor.
Expert Tip: No melting wafers on hand? If you prefer to use chocolate bars or blocks, you’ll need to temper the chocolate to achieve a smooth, shiny, and snap-able coating that won’t bloom (develop a white film). This process ensures the chocolate sets properly and has the right texture. For detailed instructions, refer to guides like How to Temper Chocolate from Epicurious.
- Soft Caramel Squares: The key here is “soft” caramels, designed to melt down into a smooth, pourable sauce. Brands like Kraft America’s Classic Caramels are ideal. Avoid hard caramel candies, as they won’t yield the desired consistency for drizzling. For an elevated twist, consider using soft sea salt caramel squares for a delightful sweet-savory contrast. Alternatively, if you’re feeling adventurous, a batch of homemade Apple Cider Caramel (cooked to 245-250 degrees F) adds an incredible depth of fall flavor.
- Heavy Cream: A small amount of heavy cream (just two tablespoons) is essential for transforming the melted caramel squares into a silky-smooth, drizzling consistency. It helps to loosen the caramel, making it easy to work with and ensuring it coats the apple slices beautifully. If you opt for a homemade caramel recipe like my Apple Cider Caramel, which typically contains cream, you can usually omit this additional heavy cream.
- A Bounty of Toppings for Decorating: This is where the creativity truly shines! The sky is the limit when it comes to decorating your **chocolate covered caramel apple slices**. From crunchy nuts to colorful candies and delightful sprinkles, small-sized toppings tend to adhere best to the warm caramel and chocolate. Get ready to unleash your inner artist in the “Decorating the Apples” section below for a plethora of inspiring ideas!
Step-by-Step Guide to Making and Decorating Chocolate Covered Caramel Apple Slices
Creating these festive treats is straightforward, but paying attention to a few crucial details will ensure your **decorated apple slices** are perfect every time—beautifully coated, easy to eat, and utterly delicious.
Prepping the Apples for Dipping
Proper apple preparation is the cornerstone of this recipe’s success. Start with whole apples, ensuring they are thoroughly washed and dried. Any residual moisture will prevent the chocolate from adhering properly, leading to frustrating results.
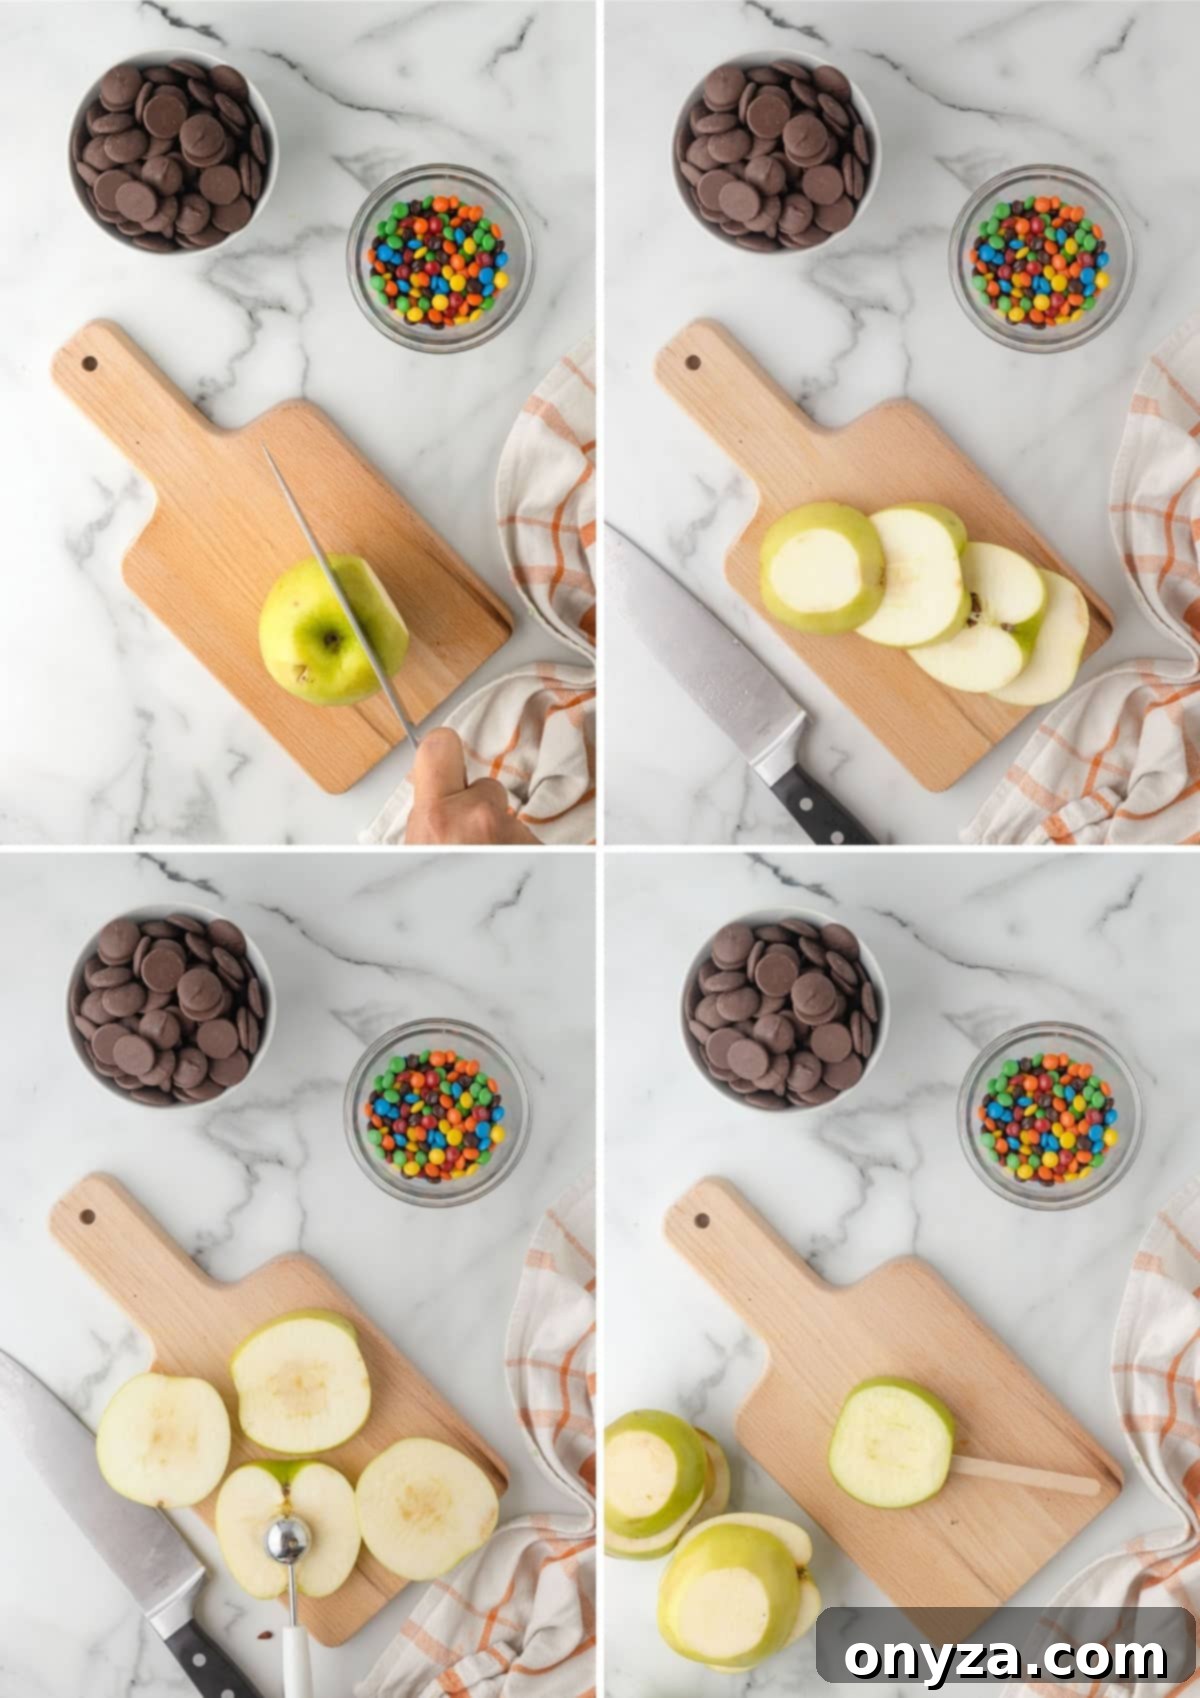
- Slicing: Carefully slice each apple from top (stem end) to bottom into 4 or 5 uniform slices, each approximately 1/2-inch thick. While you can go up to 3/4-inch thick, we find 1/2-inch is ideal for stability on the stick and a balanced bite.
- Coring: Use the tip of a small paring knife and a melon baller to meticulously remove the stem and any seeds or tough fibrous core material, especially from the center slices. Avoid digging all the way through the apple slice with the melon baller; you just want to create a clean cavity for the stick.
- Inserting Sticks: Gently insert a 10mm wide, food-grade wooden popsicle stick into the center of the bottom of each apple slice, pushing it about halfway into the fruit. Flat popsicle sticks offer better stability compared to round candy apple sticks, making the treats easier to hold and eat. If you encounter resistance or difficulty inserting the stick cleanly, use a paring knife to make a small, shallow slit in the bottom of the apple first. The need for this often varies depending on the apple variety and its firmness.
- The Critical Drying Step: This cannot be overstated. Immediately before dipping the apples in chocolate, pat them exceptionally dry on all sides using paper towels. Even the slightest hint of moisture or apple juice will cause the chocolate to repel or create an uneven coating, potentially peeling off later. Take your time with this step for perfect results.
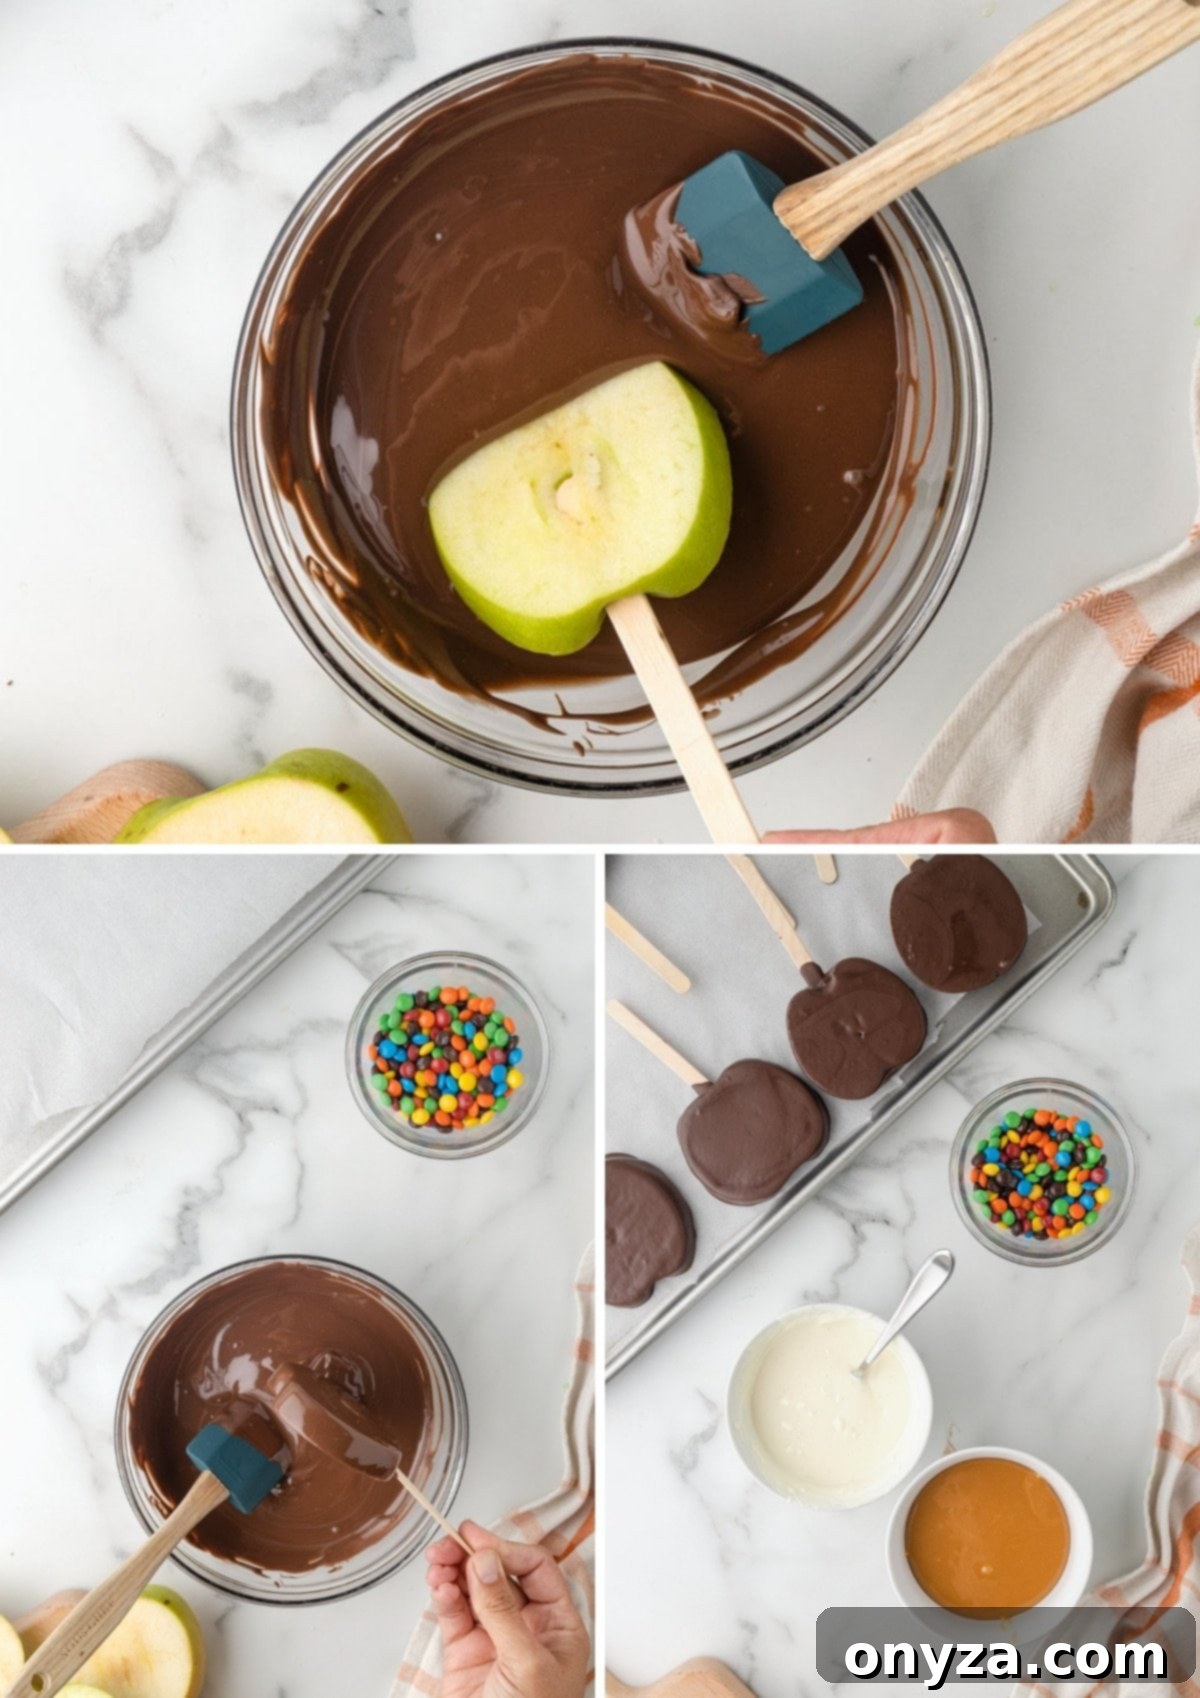
Creating the Perfect Chocolate Base Coat
The chocolate layer forms the delicious foundation for your **caramel apple slices**.
- Melting the Chocolate: Melt your chosen milk or dark chocolate wafers according to the package instructions. A double boiler offers gentle, controlled melting, while a microwave can be quicker but requires careful, short intervals and frequent stirring to prevent scorching.
- Dipping Technique: Dip each thoroughly dried apple slice into the melted chocolate, ensuring the entire apple surface is coated, extending just past where the popsicle stick meets the apple. This complete coverage not only looks appealing but also helps to seal the apple and adds stability to the finished treat. Allow any excess chocolate to drip back into the bowl for a smoother, thinner coating.
- Setting the Chocolate: Carefully place the dipped apple slices onto a baking sheet lined with parchment paper or a silicone baking mat. Ensure they are arranged in a single layer without touching each other. Immediately transfer the baking sheet to the refrigerator for 5-10 minutes, or until the chocolate is firm to the touch. This rapid chilling helps the chocolate set beautifully and prevents it from melting when the warm caramel is applied.

The Art of Drizzling with Caramel and Additional Chocolate
While your chocolate base coat is setting, prepare the luscious caramel drizzle.
- Preparing the Caramel: In a microwave-safe bowl, combine the unwrapped soft caramel squares with the heavy cream. Microwave in short bursts of 20 to 30 seconds, stirring thoroughly after each interval, until the caramel is completely melted and smooth. The goal is a pourable, but not runny, consistency. If using homemade Apple Cider Caramel, ensure it’s warmed just enough to be fluid.
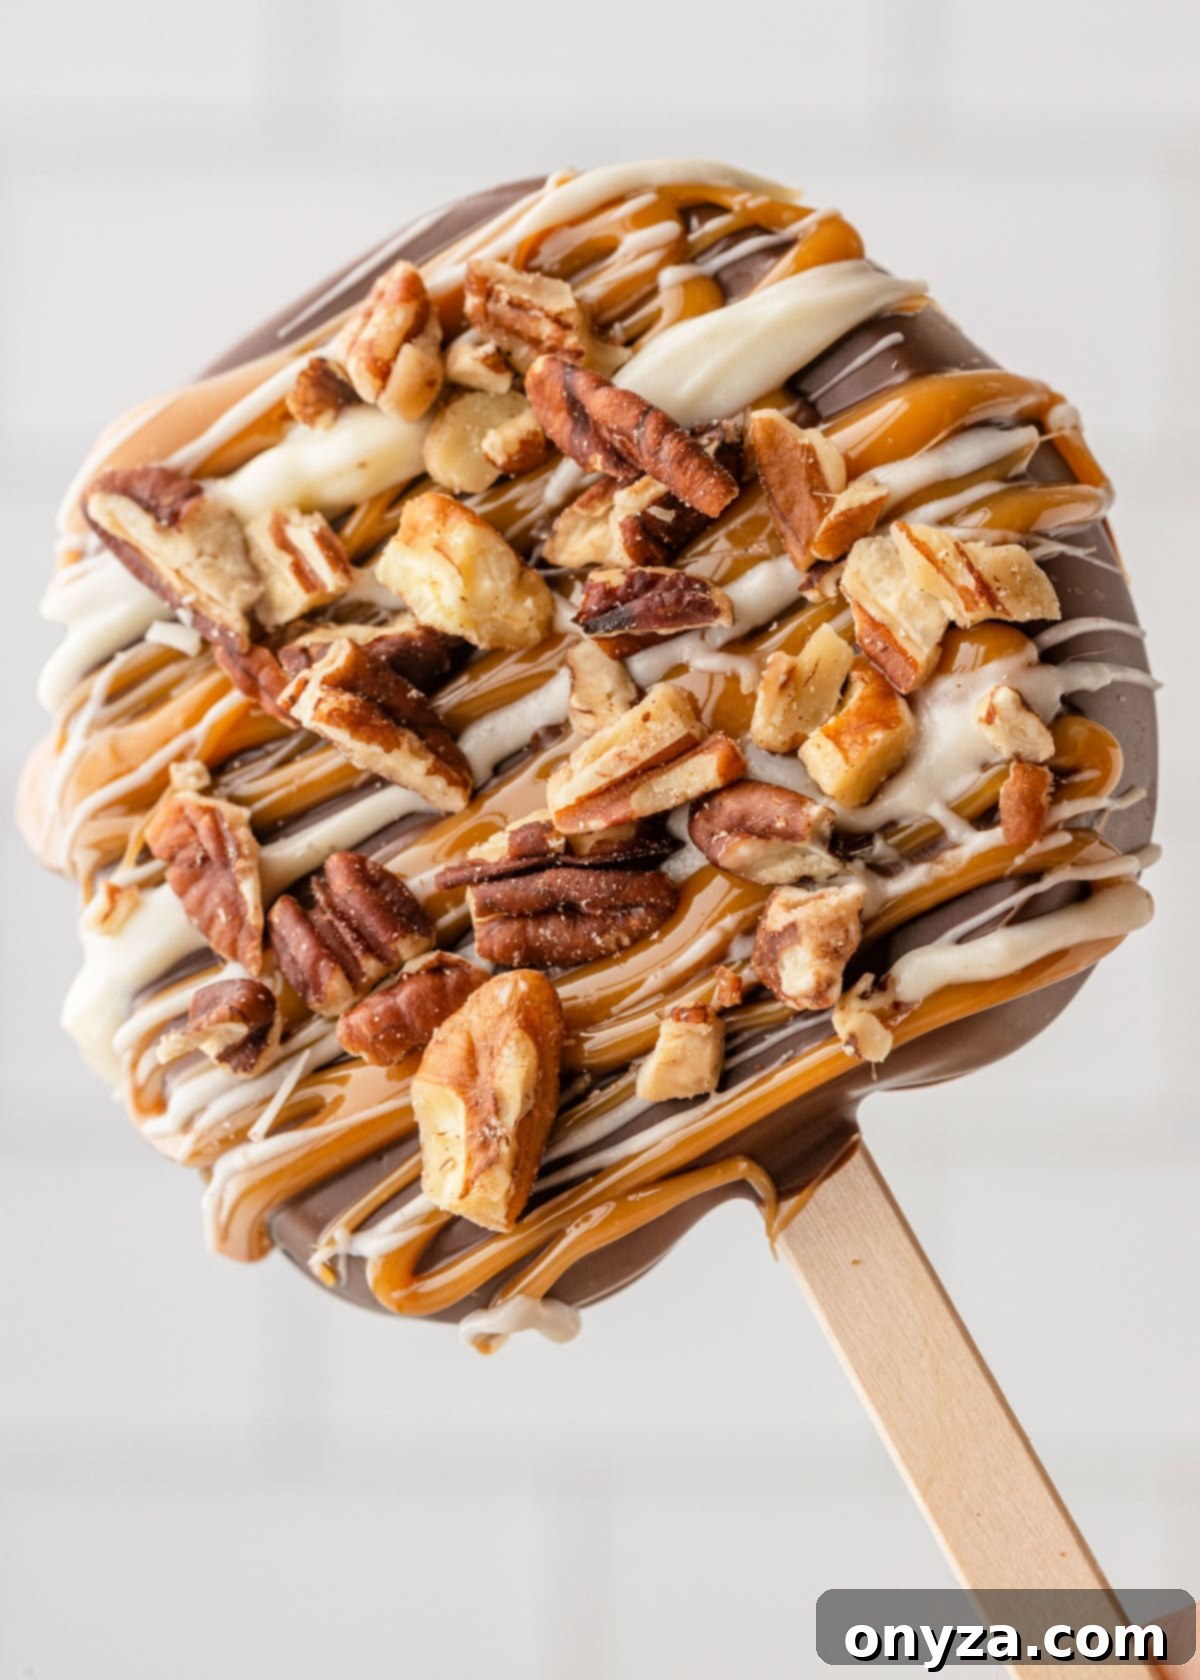
- Optional Second Chocolate Drizzle: For an extra layer of visual appeal and flavor complexity, consider adding another chocolate drizzle after the caramel has been applied. Choose a complementary variety, such as drizzling milk chocolate over a dark chocolate base, or vice versa. White chocolate, as pictured, also creates a stunning contrast. This extra chocolate layer not only looks fantastic but also provides additional “glue” for your toppings.
- Temperature Control is Key: Before drizzling either the caramel or any additional chocolate over the set apple slices, ensure that neither is excessively hot. Both should be warm enough to be fluid and drizzleable, but not so hot that they melt the firm chocolate base coat underneath. Applying liquids that are too hot can cause your beautiful coatings to run together and create a messy appearance. Aim for a comfortably warm, rather than piping hot, temperature.

Decorating the Apples with Flair
This is arguably the most exciting part of the process, especially when little helpers are involved! Decorating is best done immediately after applying the caramel and any additional chocolate drizzles, while they are still wet and tacky, ensuring toppings adhere securely.
The possibilities for toppings are vast, allowing for endless creativity and flavor combinations. Here are some popular and inspiring ideas:
- Classic Candies: Mini M&M’s, Reese’s Pieces, or chopped mini chocolate chips are always a hit.
- Nutty Crunch: A sprinkle of finely chopped nuts adds a wonderful texture and earthy flavor. Pecans, walnuts, peanuts, almonds, cashews, or pistachios are all excellent choices.
- Sweet Delights: Chopped candy bars (a fantastic way to use up leftover Halloween candy!), mini marshmallows, or colorful seasonal sprinkles (especially fun for kids!) create a visually appealing and delicious finish.
- Simple Elegance: For a sophisticated touch, a pinch or two of finely flaked sea salt over the caramel provides a delightful sweet-and-salty contrast.
- Tropical Escape: Pair chopped macadamia nuts with shredded coconut over a dark chocolate base for an exotic flavor profile.
- Cookie Crumble: Crushed Oreo cookies, Biscoff cookies, or graham crackers offer a familiar, comforting texture and taste.
- Fruity Twist: Sprinkle with chopped dried cherries or cranberries for a tart, chewy counterpoint to the sweetness.
- Sweet-Savory Pretzel Perfection: Break salted mini pretzels into small pieces and sprinkle them over the top for an irresistible sweet and savory crunch.
Once you’ve added your desired toppings, return the **chocolate caramel apple slices** to the refrigerator for an additional 10-15 minutes. This final chill helps all the layers and toppings set firmly, ensuring they stay put when served.
Serving and Storage Tips for Your Decorated Apple Slices
To ensure you experience the absolute best flavor and texture, it’s highly recommended to serve these **decorated apple slices** shortly after they have been assembled and fully set. The delightful combination of crisp apple, smooth chocolate, and gooey caramel is at its peak when fresh.
- Optimal Freshness: Since this recipe uses sliced fruit, the natural juices within the apple will eventually begin to seep out over time. This moisture can cause the chocolate coating to soften and become more prone to releasing or sliding off when bitten. Similarly, the caramel drizzles and various candy toppings can become stickier and a bit messier the longer they sit at room temperature or even in the refrigerator.
- Short-Term Storage: I’ve had excellent success storing the assembled apple slices in the refrigerator for a couple of hours prior to serving. This allows them to stay firm and fresh without compromising quality. However, for the best experience, I strongly advise against preparing them too far in advance for overnight storage. The texture and integrity of the coatings will start to degrade, and the apple might become less crisp.
- Presentation Matters: Just like with other dipped fruits, such as chocolate-covered strawberries, some small pieces of the chocolate coating or toppings may break off as you enjoy your **chocolate covered caramel apple slices**. To minimize any mess and for a more enjoyable eating experience, it’s always a good idea to serve them with a napkin or on a small plate. This thoughtful touch enhances presentation and convenience.
By following these simple serving and storage guidelines, you’ll ensure that every bite of your homemade **chocolate caramel apple slices** is as perfect as possible.

Discover More of Our Favorite Apple Desserts
If you’ve fallen in love with these **chocolate covered caramel apple slices**, you’re in for a treat! Apples are incredibly versatile, and we have a host of other delightful apple-centric recipes that are perfect for any season, especially fall. Explore these other family favorites:
- Caramel Apple Pie Rice Krispies Treats: A nostalgic dessert with an autumnal twist.
- Bourbon Apple Crisp: A warm, comforting classic with a sophisticated hint of bourbon.
- Homemade Apple Pie: The ultimate comfort food, a timeless classic made with love.
- Caramel Apple Hand Pies: Portable, individual pies bursting with apple and caramel flavor.
- Miniature Apple Raspberry Pies: A delightful combination of sweet apples and tart raspberries in a charming mini format.

Chocolate Covered Caramel Apple Slices
by Amanda Biddle
In this fun-to-make fall treat, apple slices are enrobed in dark or milk chocolate, drizzled with caramel, and adorned with your favorite toppings. Chocolate Covered Caramel Apple Slices are a delicious treat that the whole family can join in assembling!
Setting Time: 20 minutes
Total Time: 1 hour
Servings: 12 slices
Ingredients
- 3 large Granny Smith or Honeycrisp apples, washed and dried well
- 10 ounces milk or dark chocolate melting wafers (such as Ghirardelli)
- 8 ounces soft caramel squares (1 cup), unwrapped (such as Kraft)
- 2 tablespoons heavy cream
- 1 cup complementary variety chocolate melting wafers, optional but recommended (see note)
- Mini M&M’s, chopped nuts, and/or other assorted small toppings of your choosing*
Instructions
- Line a sheet pan with parchment paper or a silicone baking mat and set aside.
- Slice each apple from top to bottom into 4 or 5 slices, about 1/2-inch wide. You can go as thick as 3/4-inches, but we find anything thicker cumbersome on the popsicle stick. Use a melon baller and the tip of a paring knife to remove the stem and carve out any seeds or fibrous core. (Do not dig all the way through the apple slice with the melon baller.)
- Insert a 10 mm wide, food-grade wooden popsicle stick into the center of each apple slice from the bottom, pushing it about halfway into the fruit. (If needed, use a paring knife to cut a slit in the bottom of the apple slice before inserting the popsicle stick; the need to do this will vary by apple.)
- Melt the milk or dark chocolate wafers in a double boiler or the microwave according to package directions. Immediately before dipping the apples, pat them very dry with paper towels on all sides. Dip the entire apple slice into the chocolate, just past where the popsicle meets the fruit, allowing extra chocolate to drip off.
- Place the apples onto the prepared sheet pan in a single layer, making sure they aren’t touching each other. Refrigerate for 5-10 minutes, until the chocolate is set.
- While the apples are chilling, place caramel squares in a microwave-safe bowl. Add the heavy cream and microwave on high for 20-30 seconds at a time, stirring between intervals until the mixture is melted and smooth. Set aside to cool.
- If you’re adding extra chocolate drizzles over the caramel, melt the wafers in a double boiler or the microwave according to package directions. Let both the caramel and extra chocolate cool a bit until they’re warm and still fluid enough to drizzle. (If too hot, they will run together and will risk melting the chocolate coating on the apples.)
- Using a spoon, drizzle the caramel over the chocolate-dipped apple slices, followed by the extra chocolate, if using. Immediately sprinkle with your favorite toppings. Refrigerate for an additional 10-15 minutes, until the chocolate and caramel are set.
- For best flavor and texture, serve the apples the day you make them, within a few hours of assembly. Refrigerate until ready to enjoy. We do not recommend assembling the caramel apple slices for overnight storage before serving.
Notes
Extra chocolate drizzles make a pretty presentation with the caramel and help the toppings adhere well. Choose a variety that complements your base; so, if you’ve dipped the apples in dark chocolate, drizzle with milk chocolate or white chocolate. Ghirardelli melting wafers, which I always use for this recipe, come in all three varieties.
*For topping ideas, see the “Decorating” section in the article above.
We recommend enjoying the apple slices over a napkin or plate to catch any bits of chocolate or toppings that might fall off as you eat them.
Nutrition Estimate
Serving: 1 slice | Calories: 287 kcal | Carbohydrates: 44g | Protein: 3g | Fat: 13g | Saturated Fat: 7g | Polyunsaturated Fat: 1g | Monounsaturated Fat: 4g | Trans Fat: 1g | Cholesterol: 5mg | Sodium: 62mg | Potassium: 187mg | Fiber: 3g | Sugar: 38g | Vitamin A: 71IU | Vitamin C: 3mg | Calcium: 55mg | Iron: 1mg
Nutrition information is automatically calculated, so should only be used as an approximation.
About our recipes
Please note that our recipes have been developed using the US Customary measurement system and have not been tested for high altitude/elevation cooking and baking.
