Mastering Homemade Chili Paste: Your Comprehensive Guide to Flavorful Dried Chilies
Discover the secret to exceptionally flavorful dishes with this smoky homemade Chili Paste, an indispensable ingredient for authentic recipes like Texas-Style Chili. This versatile paste is fully customizable to your preferred heat level, allowing you to handpick the perfect dried chilies for a truly unique culinary creation.
For those who appreciate the vibrant kick and deep flavors of spicy cuisine, your pantry likely holds a treasured assortment of ground chili powders, perhaps a bottle or two of your favorite hot sauce, and possibly a convenient jar of store-bought chili paste. While these are certainly useful, have you ever considered the remarkable difference that homemade chili paste can make? Crafting your own chili paste at home is not only surprisingly easy but also incredibly rewarding, offering unparalleled customization and serving as a phenomenal flavor enhancer for a vast array of dishes.
The Unmatched Depth and Versatility of Homemade Chili Paste
Chili paste is traditionally made by toasting and rehydrating dried chilies, a process that unlocks a profound depth of flavor far exceeding that of most chili powders or bottled hot sauces. This method concentrates the chilies’ natural sugars and smoky notes, resulting in a rich, complex condiment. It’s an absolutely essential component in iconic dishes such as Texas Red Chili, where tender meat is slowly simmered in a robust sauce derived directly from this homemade chili paste and savory stock, creating a truly authentic taste experience.
The smoky chili paste recipe shared here, seasoned with earthy ground cumin, is perfectly suited for classic American comfort foods like Chili con Carne. However, its potential extends globally. By simply varying the types of dried chilies and complementary seasonings, you can effortlessly create distinct chili pastes tailored to international cuisines. Imagine a vibrant Indo-Asian Red Chili Paste bursting with aromatic spices, or a nuanced Thai Nam Prik Pao, known for its sweet, savory, and spicy profile. The possibilities are truly endless, transforming everyday meals into extraordinary culinary adventures.
To delve deeper into the fascinating world of chili pastes and their diverse applications, explore this informative Chili Paste Primer from Food52.
Understanding Chili Heat: The Scoville Scale and Essential Kitchen Safety
Navigating the Scoville Scale for Perfect Heat
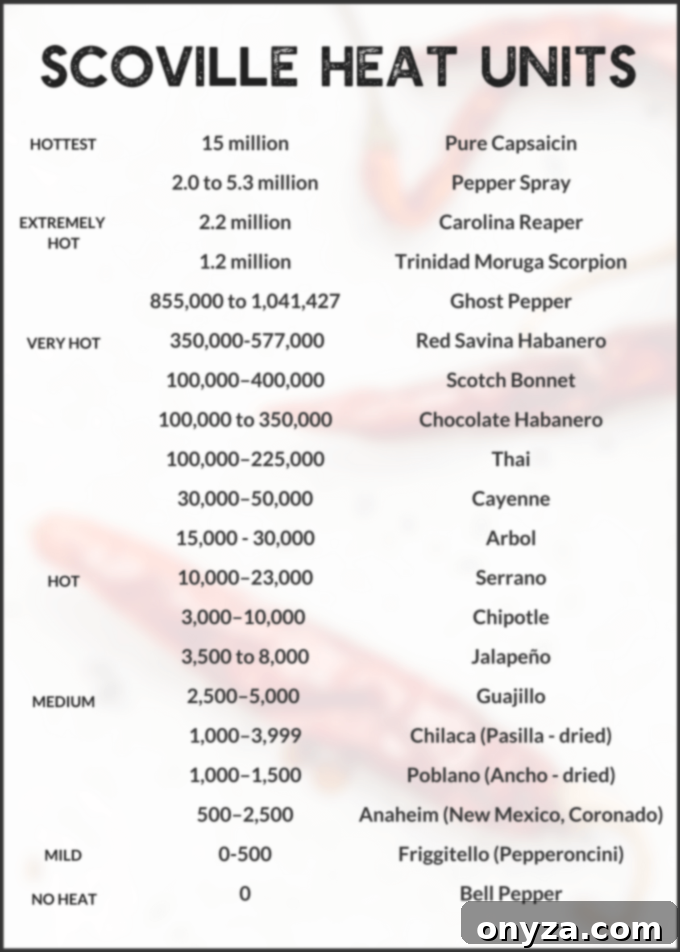
The intensity of chili peppers is scientifically measured in Scoville Heat Units (SHU) on the Scoville scale. This scale quantifies the concentration of capsaicin, the active chemical compound responsible for the heat sensation. Simply put, a higher capsaicin concentration translates to a hotter pepper. Understanding this scale is key to customizing your chili paste to your desired spice level, from a gentle warmth to an intense fiery kick. For instance, bell peppers register 0 SHU, while a common jalapeño ranges from 2,500-8,000 SHU, and a Carolina Reaper can exceed 2 million SHU! Knowing where your chosen chilies fall on this spectrum empowers you to create a perfectly balanced paste.

Essential Kitchen Safety When Working with Hot Chilies
High concentrations of capsaicin can be a significant irritant to the eyes, skin, and respiratory airways—it’s the same compound used in personal defense pepper spray for a reason. During the preparation and cooking processes, capsaicin can become airborne, leading to irritation. Therefore, it is absolutely critical to implement proper safety precautions in the kitchen to minimize discomfort and ensure a safe cooking experience.
- Wear Protective Gloves: Always wear disposable gloves when handling any hot peppers, especially when seeding, chopping, or blending. This creates a physical barrier against the capsaicin, preventing skin irritation and potential transfer to other sensitive body parts.
- Avoid Touching Sensitive Areas: Even with gloves, be mindful not to touch your face, particularly your eyes, nose, or mouth. If you accidentally touch capsaicin with bare hands, wash them thoroughly with soap and water immediately. Some chefs recommend washing with rubbing alcohol first to dissolve the capsaicin, followed by soap and water.
- Ensure Good Ventilation: When toasting chilies or blending the paste, capsaicin particles can become airborne. Work in a well-ventilated area, perhaps with a kitchen fan running, or even open a window to allow fresh air circulation. For particularly sensitive individuals or when using extremely hot peppers, consider wearing goggles or a mask to protect your eyes and airways.
- Cleanliness is Key: After handling chilies, thoroughly wash all cutting boards, knives, utensils, and countertops with hot, soapy water. This prevents cross-contamination and accidental exposure to capsaicin later on. Never use a cloth that has come into contact with chilies for other purposes without washing it first.
Selecting the Perfect Dried Chilies for Your Paste
One of the most exciting aspects of making chili paste at home is the ability to customize its heat and flavor profile precisely to your liking. Even if you’re not a fan of intensely spicy food, you can still create a wonderfully flavorful chili paste that offers depth without overwhelming heat. The choice of dried chilies is paramount to achieving this balance.
Customizing Your Heat Level: From Mild to Fiery
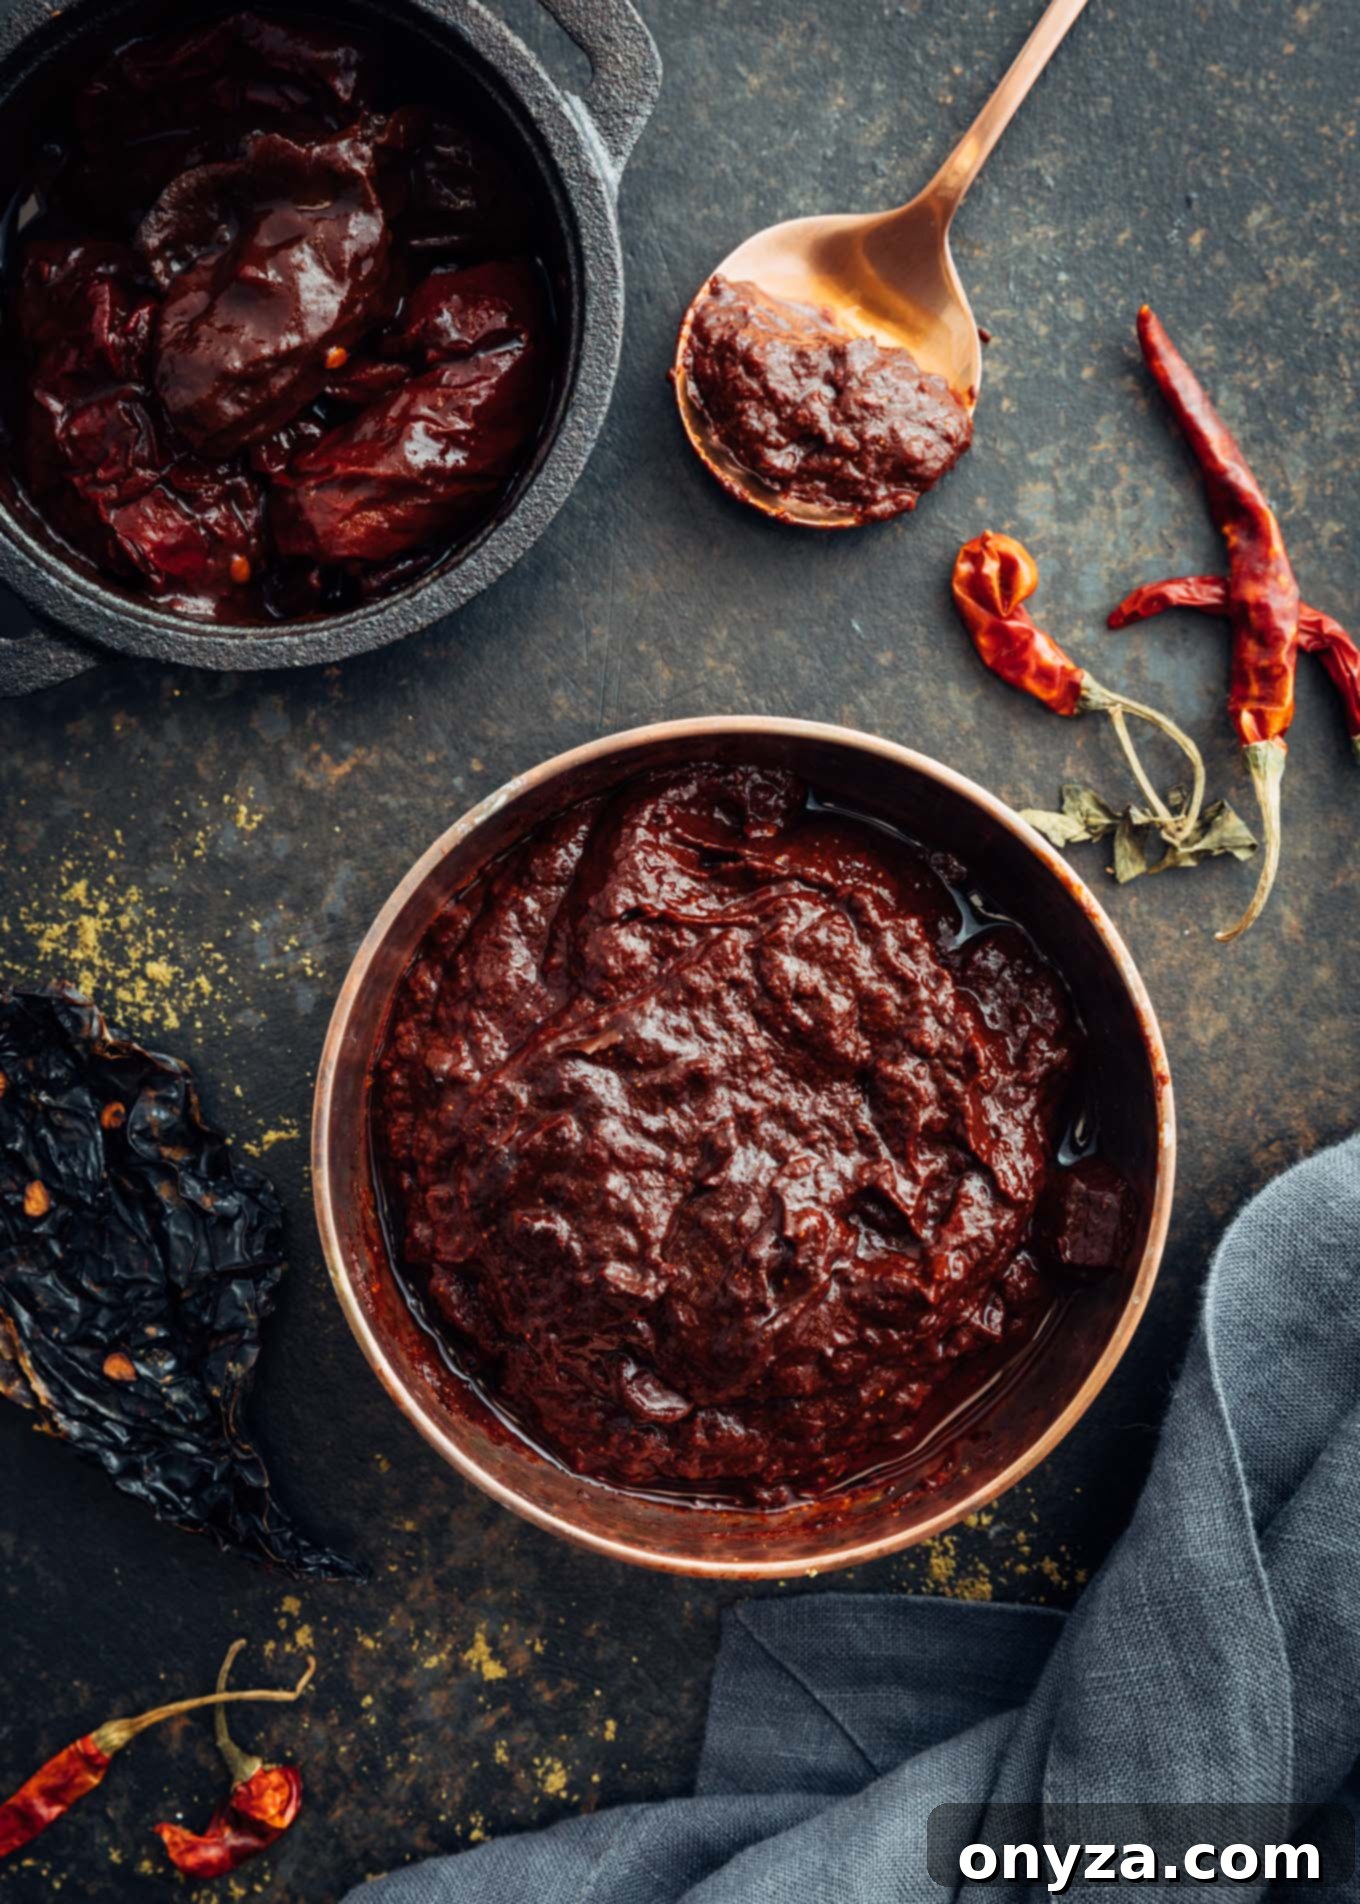
- Mild to Medium Chili Paste: For those who prefer a gentle warmth, a mild to medium range is ideal. I often opt for a harmonious blend of dried Anaheim peppers (also known as “New Mexico” chilies, typically ranging from 500-2,500 Scoville Heat Units) and Ancho chilies (which are dried Poblano peppers, offering a milder heat of 1,000-1,500 SHU). These chilies provide a rich, earthy, and slightly fruity base flavor without excessive spice. The Anaheims and Anchos are the darker chilies prominently featured in the images throughout this post, showcasing their robust appearance. For an even more nuanced flavor with a subtle kick, I sometimes incorporate a single chipotle pepper in adobo sauce. If your preference leans towards a very mild chili paste, simply omit the chipotle entirely.
- Spicy and Beyond: If you crave a more intense heat, elevate your chili paste by adding a few chilies higher up on the Scoville scale to your mix. Varieties like Serrano (8,000-23,000 SHU) or Arbol (15,000-30,000 SHU) are excellent choices. These peppers are small but incredibly potent; just a couple can deliver a significant punch of heat. When working with these potent chilies, it’s especially important to remember and adhere to the safety precautions outlined earlier to protect yourself from irritation.
Sourcing and Storing Quality Dried Chilies
For the absolute best flavor in your homemade chili paste, the dried chilies you select must be as fresh as possible. Much like any dried herb or spice, dried chili peppers gradually lose their aromatic oils and flavor intensity as they age. To ensure you’re working with chilies that boast the fullest, most vibrant flavor, it’s advisable to purchase them from specialty stores or markets with high product turnover. This increases the likelihood that you’re acquiring recently dried stock. When storing dried chilies at home, keep them in an airtight container in a cool, dark place, away from direct sunlight and humidity. Proper storage helps to preserve their flavor and extends their shelf life, ensuring your chili paste is always made with the finest ingredients.
Homemade Chili Paste (Dried Chilies) Recipe
Smoky, deeply-flavored chili paste is a cinch to make at home with dried chilies of your choice. This recipe yields about 3/4 cup chili paste, enough for one batch of Texas-Style Chili, and can be easily scaled up for larger quantities.

Rating: 5 out of 5 stars (from 5 votes)
Author: Amanda Biddle
Prep & Cook Times:
- Prep Time: 50 minutes
- Cook Time: 4 minutes
- Total Time: 54 minutes
- Yields: 12 servings (approximately 1 tablespoon per serving)
Ingredients
- 2 ounces dried chilies (see notes for variety selection based on desired heat)
- 3 cups boiling water
- 1 chipotle pepper in adobo sauce, seeds removed (optional for a milder paste; omit for very mild)
- 1 tablespoon adobo sauce
- 1 tablespoon ground cumin
- 2 teaspoons sweet paprika
- ½ cup room temperature water (plus extra as needed)
Instructions
- Toast Chilies: Heat a heavy-bottomed skillet (a cast iron pan works exceptionally well) over medium-high heat. Add the dried chilies and toast them for approximately 2 minutes per side, or until they become fragrant and slightly pliable. Be vigilant and ensure the chilies do not char or burn, as this can impart an undesirable bitter flavor to your paste.
- Rehydrate Chilies: Transfer the toasted chilies to a heat-proof bowl. Pour enough freshly boiled water over them to ensure they are completely submerged. Allow the chilies to rehydrate for 30 minutes, turning them once halfway through the soaking process to ensure even softening.
- Prepare Chilies: Carefully drain the rehydrated chilies and discard the soaking water. Using gloves, cut each chili in half lengthwise and remove the stems and seeds. For a milder paste, remove all seeds; for more heat, you can leave some.
- Blend into Paste: Place the prepared chilies into a blender or a food processor. Add the chipotle pepper (if using), adobo sauce, ground cumin, sweet paprika, and the initial ½ cup of room temperature water. Blend until a smooth and consistent paste forms. You will likely need to stop the machine and scrape down the sides of the blender jar several times to ensure all ingredients are thoroughly incorporated. If the paste appears too thick, add an additional tablespoon or two of water, one at a time, until your desired consistency is achieved.
- Store Chili Paste: Transfer the finished chili paste into a clean, airtight container. It can be safely stored in the refrigerator for up to 5 days. For longer preservation, the paste can be frozen for up to 6 months. For convenient, single-serving portions, consider freezing the chili paste in ice cube trays; once frozen, transfer the cubes to a freezer-safe bag.
Recipe Notes:
- For a MILD TO MEDIUM chili paste: We recommend using a combination of dried Anaheim (or New Mexico) chilies and Ancho chilies. If you desire a very mild spice level, simply omit the chipotle pepper from the recipe.
- For a SPICY chili paste: To significantly increase the heat, substitute 2-3 dried Arbol chilies into your mix of other dried chilies. Remember, Arbol chilies are potent, so a small quantity can make a big difference!
- Safety First: Always wear gloves when handling chilies, especially the hotter varieties, and wash your hands thoroughly with soap and water afterward. It is crucial to avoid touching your eyes or other sensitive areas while working with chilies. Depending on how high your chosen chilies fall on the Scoville scale, capsaicin fumes can cause eye irritation and even coughing. If you are using very hot chilies or are particularly sensitive, wearing goggles for eye protection is highly recommended.
Nutrition Estimate (per 1 tablespoon serving)
Please note that this nutrition information is an estimate based on the ingredients listed and should be used as an approximation.
- Calories: 22kcal
- Carbohydrates: 3g
- Sodium: 264mg
- Potassium: 104mg
- Fiber: 1g
- Sugar: 2g
- Vitamin A: 1420IU
- Vitamin C: 1.6mg
- Calcium: 9mg
- Iron: 0.7mg
Nutrition information is automatically calculated and should be used as an approximation.
About Our Recipes
Our recipes have been developed using the US Customary measurement system and have not been tested for high altitude/elevation cooking and baking. Adjustments may be necessary depending on your geographical location.
Elevate Your Culinary Creations with Homemade Chili Paste
Once you’ve experienced the superior flavor and quality of homemade chili paste, you’ll find yourself reaching for it constantly. Its depth of flavor makes it a fantastic base for so many dishes, extending far beyond the realm of traditional chili recipes. Consider using it as a potent marinade for grilled meats like chicken, pork, or beef, infusing them with smoky, spicy notes. It can be whisked into salad dressings for an unexpected kick, stirred into soups and stews for added complexity, or even blended into mayonnaise or sour cream for a gourmet dip. Imagine the possibilities for spicy hummus, vibrant sauces for tacos, or a robust rub for roasted vegetables. This paste is your secret weapon for transforming ordinary meals into extraordinary culinary experiences.
Storage and Longevity Tips for Your Chili Paste
Proper storage is key to extending the life of your homemade chili paste and ensuring its freshness. As outlined in the recipe, it can last up to 5 days in the refrigerator when stored in an airtight container. To prevent mold growth, always use a clean spoon when scooping out the paste. For longer-term storage, freezing is an excellent option. Freezing the paste in small portions, such as in ice cube trays, is particularly convenient. Once frozen, pop the cubes out and transfer them to a freezer-safe bag or container. This allows you to thaw just the right amount needed for your cooking, minimizing waste and ensuring you always have a burst of homemade flavor at your fingertips.
Never Miss a Recipe!
Loved this guide and recipe for homemade chili paste? Don’t miss out on future culinary inspiration! Enter your email below to save this recipe directly to your inbox and receive our weekly newsletter featuring new delicious recipes.
Embrace the vibrant world of homemade chili paste and transform your cooking. With its customizable heat, deep flavor, and incredible versatility, it’s a staple you’ll wonder how you ever lived without. Experiment with different chili varieties, adjust the spices, and make it truly your own. Happy cooking!
Enjoyed this recipe? Please take a moment to rate it and leave a comment below!
