Love the sweet, vibrant taste of fresh cherries? Whether you’re baking a pie, crafting a delicious preserve, or simply enjoying them as a snack, one common hurdle often arises: pitting them. While the task might seem daunting, especially with a large batch, it doesn’t have to be. This comprehensive guide will equip you with five effective and easy cherry pitting methods, ranging from specialized tools to clever DIY hacks using everyday household items. Get ready to effortlessly prepare your cherries for any culinary adventure!

This post contains affiliate links. As an Amazon Associate, I earn a commission (at no additional cost to you) from qualifying purchases made by clicking these links. As always, all recommendations and opinions expressed are my own.
Why Pit Cherries? Benefits and Uses
Before diving into the methods, let’s briefly touch upon why pitting cherries is so essential. Beyond the obvious benefit of avoiding an unexpected crunch, removing the pits makes cherries far more enjoyable and versatile in various recipes. Pitted cherries are perfect for:
- Baked Goods: Pies, tarts, clafoutis, crumbles, muffins, and cakes. Pitting ensures a smooth texture and safe eating.
- Preserves & Jams: Creating delectable cherry jams, jellies, and preserves without any hard surprises.
- Desserts & Toppings: Serving over ice cream, yogurt, pancakes, or making sauces and compotes.
- Drinks: Adding to smoothies, cocktails, mocktails, or infusing into spirits.
- Salads & Savory Dishes: Incorporating into grain salads, chutneys, or even alongside roasted meats, offering a burst of sweet-tart flavor.
Pitting also makes cherries safer, especially for children, by eliminating the choking hazard posed by the small, hard pits. No matter your culinary goal, mastering cherry pitting is a valuable skill for any home cook.
1. The Dedicated Cherry Pitter Tool: Efficiency and Precision
Let’s kick things off with the most obvious and often most efficient solution: a dedicated cherry pitter tool. If you frequently find yourself with baskets full of fresh cherries, this gadget is an invaluable addition to your kitchen arsenal. While primarily a single-use tool, many models are also perfectly designed to pit olives, extending their utility beyond cherry season.
The core advantage of a cherry pitter is its remarkable speed and precision. It employs a simple punch mechanism that pushes the pit cleanly out, leaving the fruit largely intact. This makes it ideal for recipes where the aesthetic appeal of whole cherries is important, such as a classic Clafoutis, fruit tarts, or garnishes.
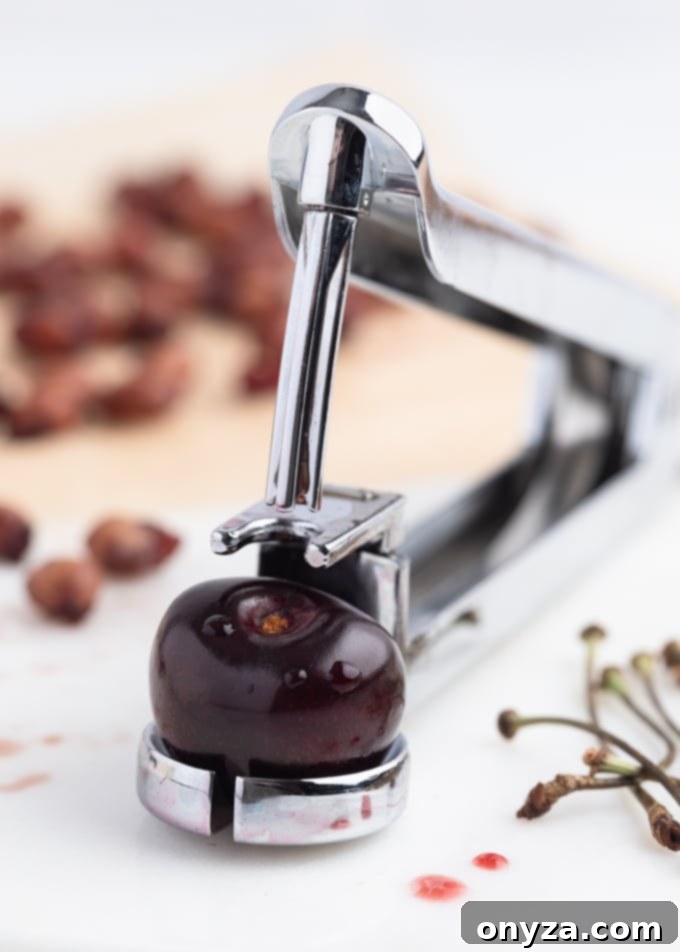
For example, preparing a batch of homemade Cherry Preserves can require several pounds of fruit – easily 150 cherries or more. With a good quality pitter, you can process this entire quantity in as little as 10-15 minutes, turning what could be a laborious task into a quick prep step. My trusty Leifheit pitter, a cherished kitchen tool for two decades, swiftly handles large volumes. While that specific model might be hard to find now, modern alternatives like the highly-rated OXO Good Grips Cherry and Olive Pitter offer similar performance and durability.
What about bulk cherry pitter machines? For truly massive quantities, multi-cherry pitters exist. However, many home models can be finicky or inefficient. If you have a recommendation for a high-performing bulk pitter, please share it in the comments below! Your insights are always welcome.
Potential Drawbacks and Solutions:
- Juice Splatter: Handheld pitters can sometimes cause juice to splatter. To mitigate this, I recommend using the pitter over a bowl placed directly in your sink. Wearing a washable apron or an old shirt that you don’t mind getting stained is also a wise precaution.
- Missed Pits: When working with very ripe or soft cherries, the pit might not always be fully expelled due to lack of resistance. It’s crucial to double-check every pitted cherry before adding them to your recipe. A quick squeeze or visual inspection ensures no guest gets an unpleasant surprise.
- Cleaning: Cherry pitters can get sticky. Rinsing immediately after use or soaking in warm, soapy water can prevent residue from hardening.
Investing in a reliable cherry pitter is a time-saver and a game-changer for anyone who loves to incorporate fresh cherries into their cooking and baking.
2. DIY Cherry Pitting with Chopsticks or Reusable Straws
No dedicated pitter? No problem! Your kitchen drawers likely hold a simple, effective solution: chopsticks or sturdy reusable straws. This ingenious DIY method leverages basic items to achieve excellent pitting results, especially for smaller batches or when you’re in a pinch.
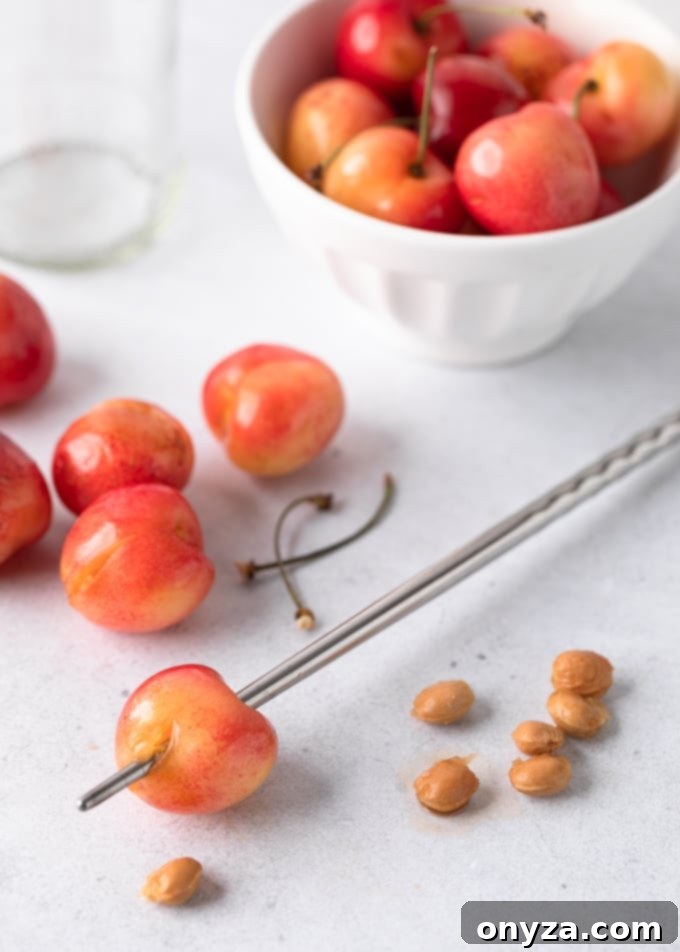
Here’s how to do it:
- Remove the Stem: Start by gently pulling off the cherry’s stem.
- Position Your Tool: Take a chopstick (metal or sturdy bamboo works best) or a robust reusable straw (metal or hard plastic).
- Push the Pit: Insert the end of the chopstick or straw into the stem side of the cherry. Gently but firmly push it through until you feel it contact the pit. Continue pushing, guiding the pit out through the opposite end of the cherry.
For enhanced stability and mess reduction, consider the brilliant “bottle trick”:
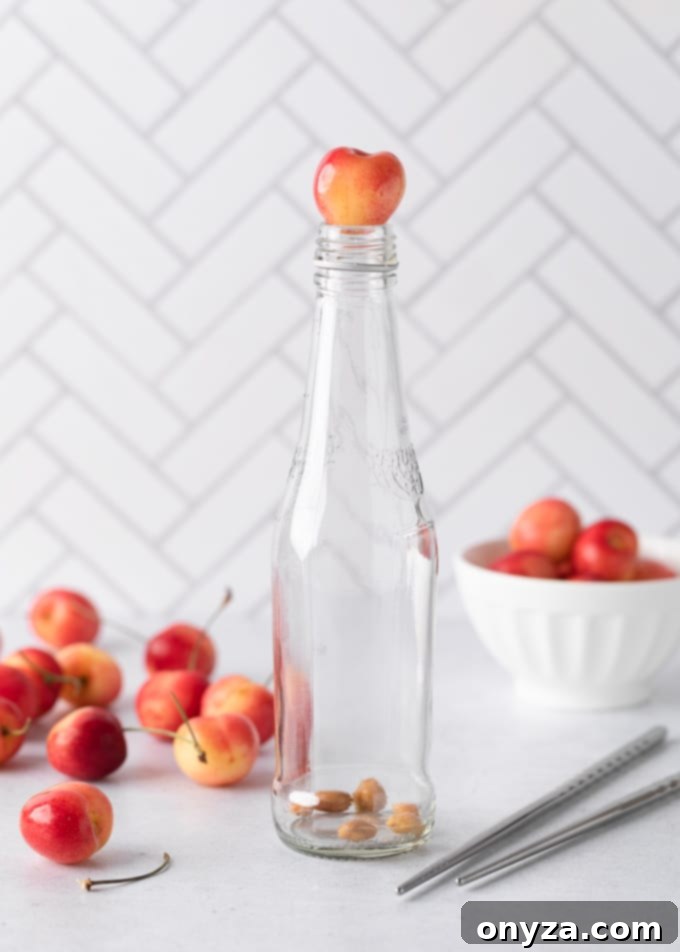
Find an empty, narrow-neck bottle – an old soda, wine, or beer bottle works perfectly. Place the cherry, stem-side up, directly over the bottle’s opening. Steady the cherry and the top of the bottle with one hand, then use your chopstick or straw to push the pit directly into the bottle. This method effectively contains any spurting juice, keeping your workspace cleaner.
Bonus Tip: Using a bottle not only provides a stable platform for pitting but also neatly collects all the cherry pits and their juices, significantly reducing cleanup time and preventing stains on your countertops or sink.
When selecting your tools, opt for chopsticks with a rounded, blunt end for a cleaner push. For straws, metal varieties like these reusable metal straws are ideal due to their rigidity. This method is surprisingly effective, keeps the cherry mostly intact, and proves that you don’t always need specialized equipment to get the job done right.
3. Pastry/Piping Tips: A Baker’s Secret for Cherry Pitting
For those who love to bake, your cake decorating tools can serve a delightful double duty as a DIY cherry pitter. Metal pastry or piping tips, commonly used for frosting, offer a surprisingly effective way to remove cherry pits, especially when you need a quick solution and already have them on hand.
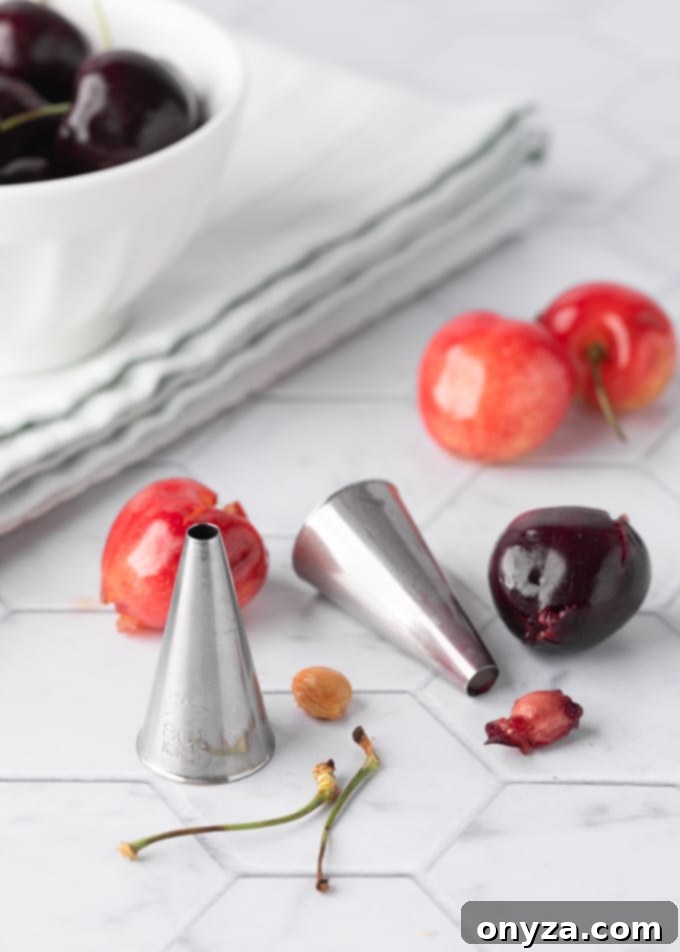
The technique is straightforward:
- Prepare the Cherry: Remove the stem from the cherry.
- Position the Tip: Place the cherry, stem-side down, directly over the narrow opening of a sturdy metal piping tip.
- Gently Press: Apply gentle, even pressure on the fruit until the tip pushes the pit cleanly through the cherry. The pit will typically drop through the wider end of the piping tip.
Choosing the right tip is crucial for success. I find that plain (round) tips work best, as their smooth edges minimize damage to the fruit. Avoid star tips, which can not only be uncomfortable to press against (potentially pinching your fingers) but also leave jagged, less attractive holes in your cherries. In terms of size, a tip with a diameter just slightly larger than the cherry pit is ideal. For most cherries, I often reach for Ateco’s 3/16″ plain tip (#801) or their slightly larger 1/4-inch (#802). If the tip is too small, centering it on the pit becomes challenging; too large, and you’ll remove an excessive amount of precious fruit flesh.
Drawbacks: While effective, this method tends to extract more juice than a dedicated pitting tool, and the cherry might occasionally split. This makes it a perfect method for recipes where perfectly intact, visually flawless cherries aren’t a top priority, such as when making cherry compotes, fillings for pies (where they’ll be cooked down), or adding to smoothies. For dishes where appearance is key, like fresh garnishes, other methods might be preferred.
Heading to the market? Maximize your cherry experience by learning how to select the best fruit. Check out “How to Buy and Store Cherries Like a Pro” from Epicurious for expert tips before you pit!
4. The Humble Paper Clip Pitter: A Creative Solution
Who knew office supplies could double as kitchen tools? A standard paper clip, bent into a simple shape, can become a surprisingly effective DIY cherry pitter. This method is perfect for those moments when you have a small handful of cherries to pit and no other tools at your disposal.
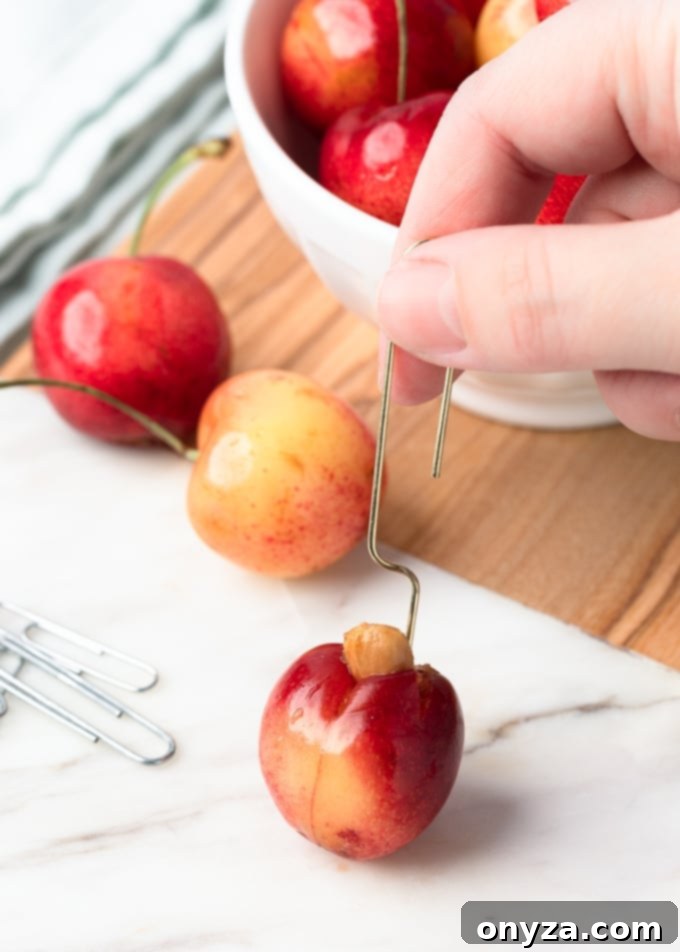
Here’s how to craft and use your paper clip pitter:
- Bend the Clip: Take a paper clip and fully unfold the inner loop, bending it backward until it forms a long, flat “s” shape. You’ll have two hooks – one larger, one smaller – at either end.
- Carve & Scoop: Remove the cherry stem. Choose the hook size that best fits your cherry (the larger end is often more effective for standard cherries). Carefully insert the hook into the center of the fruit from the stem side, aiming to go around the pit.
- Extract the Pit: Once you feel the hook beneath or around the pit, gently twist and scoop in a circular motion. Try to keep the entry point as small as possible to preserve the fruit’s integrity. Use the clip to lift the pit out of the cherry.
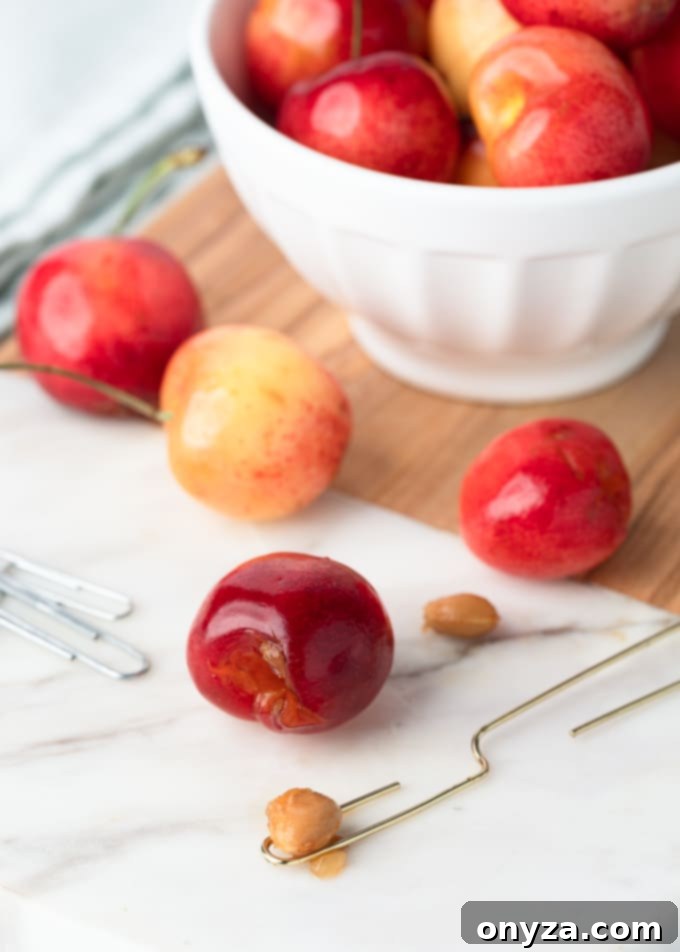
For optimal results, I find that slightly heavier, larger paper clips (like 50mm clips) work best. Their increased strength helps them withstand the pressure of extracting the pit without bending, which can be an issue with smaller, thinner clips. This method requires a bit more finesse and patience than a dedicated tool, but it’s remarkably effective for a DIY solution.
Drawbacks: This method can be a bit messier, especially with very ripe or juicy cherries, as you’re essentially carving around the pit. To minimize cleanup, always perform this task over a bowl to catch any escaping juices and pits. While it might take a little longer than other methods, the paper clip pitter is a testament to resourceful cooking.
5. Pitting Cherries with a Knife: For Precision and Control
When all else fails, or if you prefer a method that offers more control, a simple paring knife or chef’s knife can be used to pit cherries. While it might be slightly more time-consuming and potentially messier than using a dedicated tool, it’s a reliable technique that requires no special gadgets.
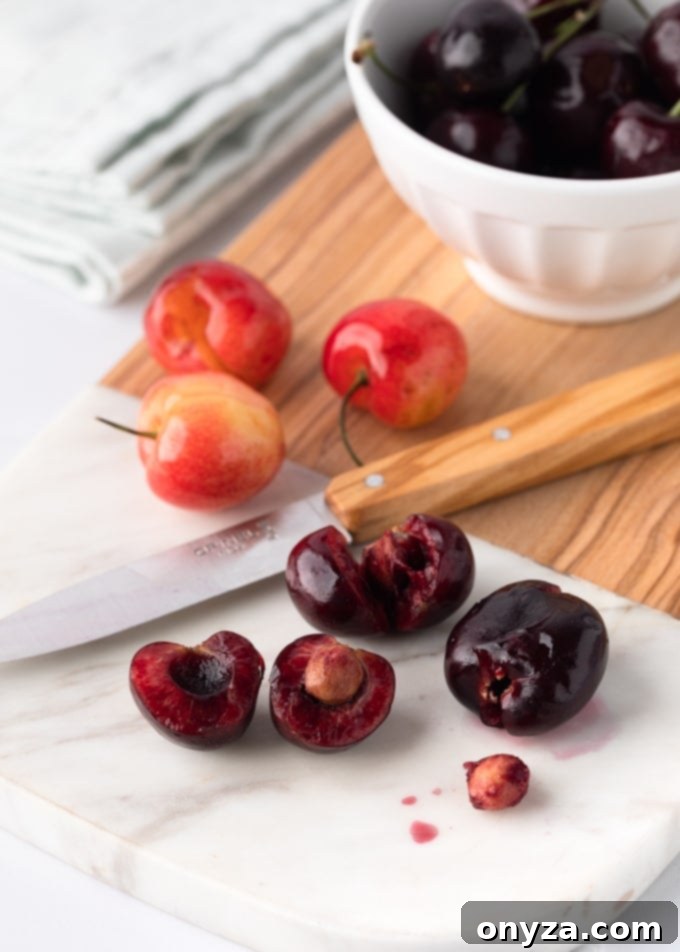
Always exercise caution when using a knife. After removing the cherry stems, you can employ one of two primary methods:
A. The “Avocado” Method (Halving):
- Slice Around the Pit: Hold the cherry firmly. Using a small, sharp paring knife, cut the cherry lengthwise all the way around its circumference, keeping the blade pressed against the pit.
- Twist and Separate: Once you’ve cut all the way around, gently twist the two halves of the cherry apart. One half will likely retain the pit.
- Remove the Pit: Carefully dislodge the pit from the cherry half using the tip of your paring knife or your fingertips. This method yields two cherry halves, perfect for salads, garnishes, or when you need smaller pieces of fruit.
B. The “Crush and Extract” Method:
- Gently Crush: Place the cherry on a cutting board. Use the flat side of a chef’s knife or the bottom of a heavy glass to gently but firmly crush the cherry. The goal isn’t to obliterate it, but to apply enough pressure to loosen the pit from the flesh.
- Slit and Remove: Make a small slit in the side of the crushed cherry with a paring knife. The loosened pit should now be easy to pop out with your fingertips. This method often results in a slightly mashed cherry, making it ideal for purees, sauces, or jams where the appearance of whole fruit isn’t a concern.
Important Tip: Cherry juices are notorious for staining! They can permanently mark porous surfaces like wood cutting boards and unsealed marble, as well as temporarily stain your fingertips. To prevent this, consider laying down parchment paper or a silicone mat on your cutting surface. Wearing kitchen gloves is also an excellent practice for easy cleanup and stain prevention.
General Tips for Cherry Pitting Success
- Choose Ripe Cherries: Ripe cherries are not only sweeter but also softer, making the pitting process easier. Overripe cherries, however, can be too soft and prone to squishing.
- Work on a Protected Surface: As mentioned, cherry juice stains. Always work over a surface you don’t mind getting messy, or protect your counter with parchment paper, a silicone mat, or by working directly in the sink.
- Wear an Apron: Protect your clothing from splashes and stains.
- Rinse Tools Immediately: Cherry juice dries quickly and becomes sticky. Rinsing your pitter, chopsticks, or knife immediately after use will make cleanup much simpler.
- Batch Pitting: If you have a large quantity, consider setting up an assembly line for efficiency. Wash and stem all cherries first, then pit them in batches.
- Storage of Pitted Cherries: Pitted cherries can be stored in an airtight container in the refrigerator for 3-5 days. For longer storage, they can be frozen (spread on a baking sheet until solid, then transfer to freezer bags) for up to a year.
With these five methods and helpful tips, pitting cherries no longer needs to be a dreaded chore. Experiment with each technique to find the one that best suits your needs, the type of cherries you’re using, and the recipe you’re preparing. Happy pitting!
Do you have a favorite technique for pitting cherries, or a clever hack we missed? Share your insights and tips in the comments below! We love hearing from our readers.
